SPYERA can be installed on rooted and non-rooted Android devices. However, some advanced features only work on rooted devices. The following step by step guide can be used to root any of the flagship Samsung devices belonging to the S10 series.
Supported Variants & Models
- Samsung Galaxy S10
- Galaxy S10+
- Galaxy S10e
Preparations
In order to root Galaxy S10/S10+/S10e, you must first fulfill the list of requirements as stated below.
- The rooting process will wipe the device completely, including internal storage. So, make sure that you take a complete backup of all the data before you proceed.
- Charge your device to a sufficient battery level (above 50% at least)
- Ensure that you have downloaded and installed the Samsung USB drivers from this link.
- Ensure that you have downloaded and unzipped the latest version of Odin from this link.
Step 1 - Unlock the Bootloader
In order to root Samsung Galaxy S10/S10+/S10e, you must first unlock the bootloader.
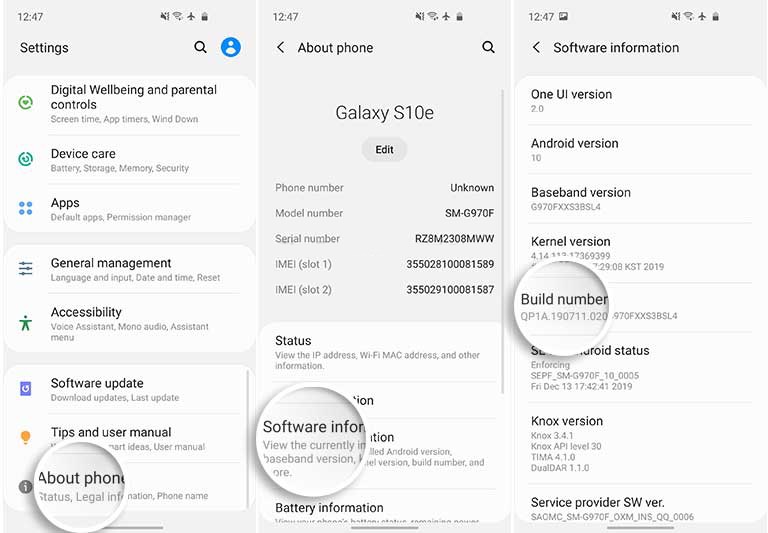
- Go to ‘Settings’ > ‘About phone’ > ‘Software information’ on your Galaxy S10.
- Continuously tap on the ‘Build number’ section to enable the ‘Developer options’.
- You should see “Developer mode has been turned on” message on the screen.
- Go back to the ‘Settings’, scroll down to the very bottom and tap on ‘Developer options’.
- Tap on the ‘OEM Unlocking’ toggle and select ‘Turn on’.
- Now, power off your device completely.
- Now when it is in the off-state connect it using a USB cable to your PC while pressing the "Bixby" and "Vol Down" buttons together.
- Now release the buttons and press and hold the "Vol Up" button to unlock the bootloader on Samsung Galaxy S10, S10+ or S10e.
- Your device will be wiped (erased) completely and will automatically reboot. IMPORTANT: Skip through the initial setup and make sure to connect the device to a WiFi connection. Do not set up any accounts yet!
- When it is completely booted up you need to enable the "OEM Unlocking" again by repeating steps 1-to-5 again to enable Developer options
- Now make sure that "OEM Unlocking" in the "Developer Options" is "ON" and greyed out. If so you are good to proceed.
Step 2 - Root Samsung Galaxy S10/S10+/S10e
- Download stock firmware for your Samsung Galaxy S10 device: Galaxy S10 (SM-G973F): Download Link | Alternative Link
Galaxy S10+ (SM-G975F): Download Link | Alternative Link
Galaxy S10e (SM-G970F): Download Link | Alternative Link - Extract the downloaded firmware on the PC
- Copy the ‘AP’ file (.tar) to the device’s storage
- On your Galaxy S10 device, download the Magisk Manager v7.3.0 APK and install it
- Open Magisk Manager and tap on the ‘Install’ button
- Tap on ‘Install’ again and then on ‘Select and Patch a File’
- Navigate to the storage and select the AP tar file that was transferred earlier
- Magisk Manager will now patch the file and output the patched system firmware (AP) file to ‘[Internal Storage]/Download/’
- Now transfer the ‘magisk_patched.tar’ file to the PC
- Run the Odin v1.13.1 tool on the PC
- Power off your Galaxy S10 device and boot into the download mode by Hold the Bixby and Volume Down buttons together and connect the phone to the PC using the USB cable
- On your PC open ODIN, The ‘ID: COM’ port in the Odin window should light up
- Important: Click on the ‘Options’ tab in Odin and uncheck ‘Auto-Reboot’
- Click on the ‘AP’ button and select the patched system firmware file (magisk_patched.tar) file
- Click on the ‘Start’ button to flash Magisk and root Samsung Galaxy S10/S10+/S10e
- Now, it is very important that you boot your Galaxy S10 device into stock recovery and perform a factory data reset.
Press the ‘Power’ and ‘Volume Down’ buttons to exit download mode. As soon as the screen turns off, press the ‘Power’, ‘Bixby’, and ‘Volume Up’ buttons together to boot into the stock recovery. Make sure that you keep pressing the ‘Volume Up’ button until the stock recovery screen appears. - Use the Volume buttons to highlight the ‘Wipe data/factory reset’ option and press the Power button to select it
- Now, select the ‘Reboot system now’ option and immediately press the Power, Bixby, and Volume Up buttons together until the Bootloader Warning screen appears
- As soon as the Bootloader Warning screen appears, release all the buttons to boot your Galaxy S10/S10+/S10e into the rooted system.
- There is one more step left, once your phone is booted up, open the "Magisk Manager" app and it will perform all the remaining necessary actions. Once done, your Galaxy S10, S10+ or S10e will reboot automatically and it will be rooted with Magisk!... Hurray!
How about other brand China made android phones? I see instruction for Samsung phones only.