
This guide shows you how to root Samsung SM-N950F (Galaxy Note 8) and SM-N960F (Galaxy Note 9) devices — Samsung’s flagship Galaxy Note phones — using TWRP recovery and Magisk. Both models are years past their original Android updates in 2026, so rooting remains one of the best ways to keep them useful: ad-blocking, full backups, custom kernels, and app permissions Samsung no longer allows on stock firmware.
Rooting is a three-step process. First, install a custom recovery like TWRP. This lets you flash custom binaries, known as flashable ZIPs. Next, disable encryption and prevent a Pre-Normal RMM State by flashing the no-verity zip and the RMM State Bypass zip. Finally, root the device by flashing the latest Magisk zip. Whether you’re doing a Samsung Note 8 root for the first time, need to know how to root Samsung Note 8 step by step, or searched for how to root Galaxy Note 8 specifically, this is the complete process.
One important note before you start: if you’re looking for a Galaxy Note 8 US Cellular root or a Galaxy Note 9 US Cellular root method, most US carrier variants (Verizon, AT&T, US Cellular, Sprint) ship with a locked bootloader that blocks OEM Unlock entirely, so this guide won’t work on them. It applies to internationally unlocked SM-N950F/N950N and SM-N960F/N960N models only.
Supported Variants & Models
- Samsung Galaxy Note 8 (codename “greatlte”) – SM-N950F/N, released 2017, officially updated through Android 9 Pie (One UI 1.1)
- Samsung Galaxy Note 9 (codename “crownlte”) – SM-N960F/N, released 2018, officially updated through Android 10 (One UI 2.1)
Both devices are unlocked/unbranded international models — Snapdragon and Exynos variants are supported the same way.
Preparations
- Take a complete backup of all your data on the device. Everything — apps, contacts, messages, logs, internal storage — will be wiped during the process. Use Samsung Smart Switch or a cloud backup for this.
- Charge the device to at least 60% battery. This helps avoid a sudden shutdown mid-flash.
- Install the Samsung USB drivers on your PC.
- Download a current copy of Odin (Odin3 v3.14 or the newer cross-platform Odin4 tool) from a trusted source such as the XDA-Developers forum, and extract it to an easily accessible folder.
Downloads
- Odin – get the latest release from a trusted community source like XDA-Developers; avoid random file-sharing mirrors.
- Magisk – always grab the current release (v27 or newer as of 2026) from the official Magisk GitHub repository, not an old cached ZIP.
- TWRP Galaxy Note 8 / Galaxy Note 9 recovery image – download the correct .img.tar for your model from the official TWRP site (search “greatlte” for Note 8, “crownlte” for Note 9).
- RMM State Bypass zip – widely mirrored on XDA-Developers root threads for the Note 8/9; it stops the phone from re-locking OEM Unlock 7 days after a Data Format.
Enable Developer Options and OEM Unlock in Settings
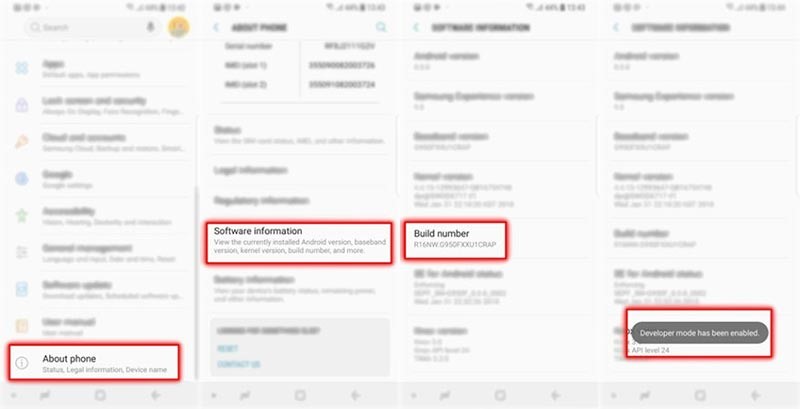
Before the actual process, enable Developer Options and OEM Unlock. Go to Settings → About Phone → Software Information and tap “Build number” 7 times. You’ll see a toast notification: “Developer mode has been enabled.”
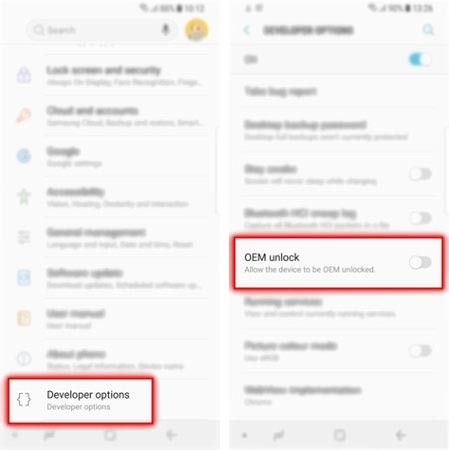
Next, go to the Settings main screen and tap “Developer options.” Scroll down until you find the “OEM Unlock” toggle and turn it ON.
If the option isn’t visible yet, your phone may still be in Samsung’s 7-day OEM Unlock buffer period after a fresh setup. After that window, the option becomes available. If it’s still missing after 7 days, that specific device or carrier build cannot be rooted.
Install TWRP Recovery
- Download the correct TWRP recovery image for your device from the Downloads section above.
- Open the extracted Odin folder and launch the Odin executable.
- Power off the phone completely.
- Hold Volume Down, Bixby, and Power simultaneously until you see the warning screen.
- Press Volume Up once to enter Download mode. The screen should show “Downloading.”
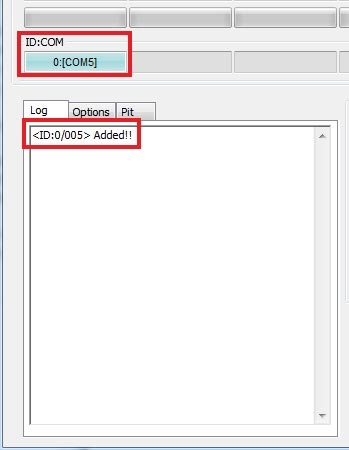
- Connect the phone to the PC. In Odin, you should see “Added!!” in the message box and the ID:COM port light up.
- In Odin, click the “Options” tab and make sure “Auto Reboot” and “Re-Partition” are unchecked.
- Click the “AP” button under the “Files” section.
- Select the TWRP .tar file you downloaded for your device.
- Click “Start” to flash TWRP recovery.
Once flashing finishes, the phone stays in Download Mode. Do not let it boot into the OS at this point — if it does, the Pre-Normal RMM State gets set and you’ll have to wait out another 7-day buffer before you can flash anything else. Instead, boot straight into TWRP as described below.
Boot to TWRP Recovery & Root the Device
- While the phone is still in Download mode, hold Volume Down, Bixby, and Power simultaneously until the screen goes off.
- Important: the instant the screen shuts off, release Volume Down and immediately hold Volume Up instead, while still holding Bixby and Power.
- The device should now boot into TWRP recovery.
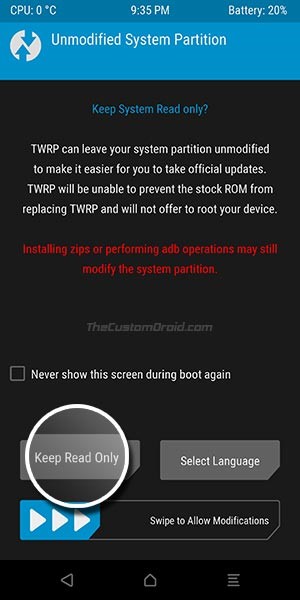
- On the “Unmodified System Partition” screen, slide “Swipe to Allow Modifications.”
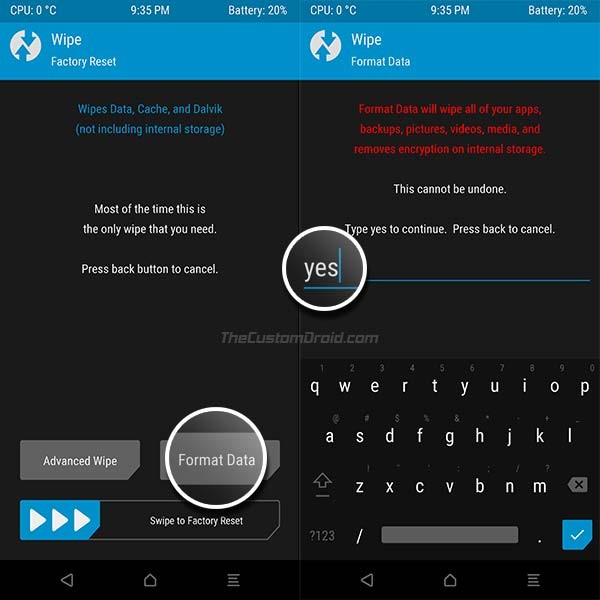
- You’ll see the TWRP main screen with 8 options. Tap Wipe, then Format Data, type “yes” in the field, and hit Enter to format the device.
- Go back to the main TWRP screen with the 8 options.
- Tap Reboot, then Recovery. If it asks to install the TWRP app, tap Do Not Install. Once the device reboots back to the “Unmodified System Partition” screen, swipe to allow modifications again to reach the 8-box screen.
- Connect the phone to your PC — you should now see its internal storage. Transfer the RMM Bypass zip and the current Magisk zip to internal storage.
- Tap Install, select the RMM Bypass zip, and swipe to confirm.
- Go back and repeat the previous step, this time selecting the Magisk zip.
- Once installation completes, tap Reboot System.
When it boots up, set the phone up like a new device. You should now have full root access on the device via Magisk, confirmed by opening the Magisk app and checking that root is granted.
Modern Alternative: Magisk’s Patch-Image Method
If you’d rather avoid TWRP entirely, current Magisk releases can root many Note 8/9 firmware builds without a custom recovery: extract the boot.img from your firmware’s AP tar file, patch it inside the Magisk app on an already-booted phone, then flash the patched image back through Odin’s AP slot and reboot. It’s a smaller, more reversible change than a full TWRP install, though TWRP is still worth having if you also plan to flash custom ROMs.
Why Root Your Galaxy Note 8 or Note 9 for Monitoring?
A common reason people root a spare Note 8 or Note 9 in 2026 is to run more capable monitoring software on it — for a child’s device or a company phone you own and are authorized to manage. Root access lets monitoring apps go beyond what stock Android permits, including reading WhatsApp messages and other end-to-end encrypted chats directly from the device. Standard tracking like GPS location history and geofencing generally works without root at all. If you’d rather skip the rooting process altogether, SPYERA’s Android Spy App covers most monitoring needs on stock firmware — compare features and plans on the pricing page before deciding whether rooting is necessary for your use case.
Whatever phrase brought you here — you want to root Samsung Note 8, get a Galaxy Note 8 root, pull off a Samsung Galaxy Note 8 root, or root Samsung Galaxy Note 9 — the SM-N950F/N and SM-N960F/N steps above are identical. A Galaxy Note 9 root uses the exact same TWRP + Magisk flow, and the Galaxy Note 9 TWRP image (crownlte) is on the official TWRP site alongside the Note 8 build.